from my Pinterest feed...
I was smitten the moment I laid eyes on it.
It was beautiful.
It wasn't something I would normally make. I like my blankets closely crocheted. No big holes for fingers and toes to poke through or get caught. Save the lacy patterns for something decorative. Thick heavy blankets like my faux chenille quilts are my preference.
Oh, but those colors! I had to find out more...
And find out more I did. This is the afghan that opened up a whole new world for me.
Researching the pattern, I found that the original Persian Tiles pattern was written by Jane Crowfoot
(aka Janie Crow) and available for purchase on Ravelry. The colorway for the Eastern Jewels version was made by Lucia Dunn for Stylecraft, a yarn manufacturer in the United Kingdom. Unfortunately the only way to get Lucia Dunn's instructions was to purchase the Persian Tiles Eastern Jewels kit that Stylecraft put together.
Lucia Dunn blogs at Lucia's Fig Tree. I devoured her blog. Her original blog post about this afghan is
HERE. I found that the kit could be ordered through Poppy's of Holfirth. Unfortunately again, I found that these kits were backordered. Ughh!! I had my heart set on making this afghan by now. Without much hope, I put my name on a list asking to be emailed when the kits came in stock... then went back to obsessing about this afghan.
When I was a child I remembered that my mom would get all kinds of catalogs in the mail. Among them were always catalogs from needlework companies that showed a multitude of wonderful wonderful kits. I wanted to do them all. We never ordered anything because we didn't have that kind of money back then, but I poured over those catalogs. Sometimes the photographs were so good that I could actually copy the cross-stitch patterns from the catalog. I would transcribe the pattern on a piece of graph paper and try to re-create the pattern on my own.
As I got better with all my needlework skills it wasn't just cross-stitch that I could re-create from a photo. It was almost anything. Give me a detailed enough photograph and I could eventually copy it.
I was really tempted to try and re-create this afghan on my own. There were plenty of detailed photographs of finished afghans all over the internet by now. The kit that was on backorder from Poppy's even listed the contents of the kit so I knew the names and amounts of the Stylecraft yarn colors I would need. I could order Janie Crow's Persian Tiles pattern book then try to figure out Lucia Dunn's colorway from photos. Oh, but that would be so much trouble... plus I already had plenty of other projects to work on... and so I pushed this lovely afghan out of my head.
So that was in May 2018.
July 16, 2018 -
I got the email!!! The kit was back in stock at Poppy's. I ordered it immediately. I'm glad I ordered it when I did because now it's unavailable. I quite honestly don't know where one would get one now.
The kit shipped from the United Kingdom. It took 2 days for it to get from the United Kingdom to Chicago, Illinois - a city roughly 200 miles or 4 hours from where I live. It then took
11 days for the package to get to my house. Yes, I was a bit impatient!
It's here!
September 5, 2018
I couldn't wait any longer. Never mind all my other WIPs (works in progress), I started the Eastern Jewels.
So remember when I said this afghan opened up another world? Well Instagram was one of them. I had dipped my toe into the Instagram world - mainly because that was how my kids were communicating with their friends and I needed to get in touch with some of them - but now I decided to use my Instagram account as my crafting social media account. I discovered hash tags. Who knew that searching a hash tag could return so much information and connect you with like minded souls?
Like minded souls from all over the world at that! I don't know if it was because this particular pattern had British origins or not but I have come across SO many people from Great Britain and Australia, as well as across Europe. Far more than any Americans. Maybe if this were a quilt pattern I would come across more people from the US? In any case, I loved the diversity.
September 11, 2018
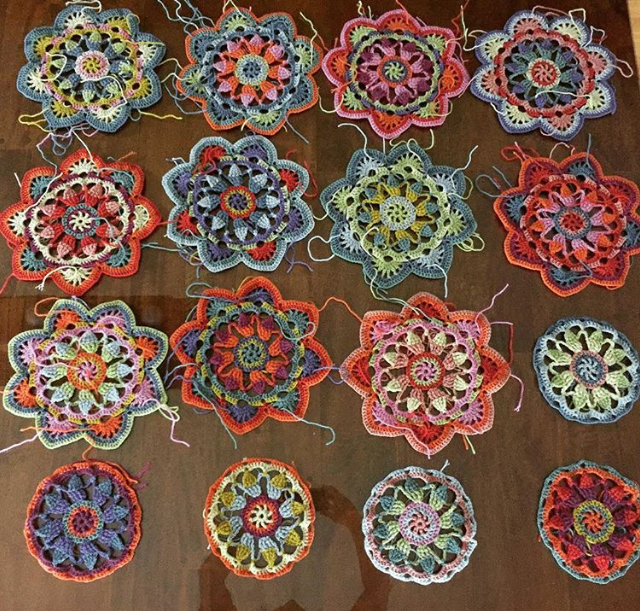
After 1 Week I had progressed to Round 7 (of 14) on all 16 of my tiles.
September 18, 2018
After Week 2 I had up to Round 9 done on 11 of my tiles.
September 21, 2018
After Week 3 I had up to Round 9 completed on all my tiles. I was addicted!!
One of the reservations I've always had on doing granny squares or any kind of afghan that is done in pieces that need to be joined are all the various ends that need to be sewn in. I decided though to leave all my ends until the end to sew in. I know it is far easier to crochet over them as you go, however I've never felt that they were quite secure that way. When I sew in my ends I use a sharp needle and sew them in back and forth through the fibers of the surrounding yarn. Once this is done it is permanent. You will have to cut the blanket apart if anything needs undone. Therefore, since I'm also afraid I might have to frog something several rounds in the future, I always leave my ends until I am
absolutely totally sure that I am done! Plus, leaving them until the end also gives me more options as to where to sew them in to hide them. Thus, here is my stringy pile of tiles...
September 26, 2018
Now I have 7 complete tiles and all I want to do is work on this afghan! Too bad I have a day job.
October 2, 2018
Week 4 and all 16 tiles are done!
I've started on my granny squares.
Yay!!
October 4, 2018
All the granny squares are now done and I'm starting to sew in the ends
October 9, 2018
After endless hours of patient sewing, my ends are done!!! Such a satisfying feeling to see all my completed tiles and granny squares so nice and neat.
Tiles
Granny Squares
It's coming together!
October 14, 2018
I've finished all my large and small triangles now so this afghan is seemingly almost done. All that's left is to join the blocks together and crochet the border...
However... I like large afghans. An afghan that will cover your whole body and one you can really curl up in. At this point this afghan measured 50 inches square. It was beautiful but with as much work as I had put into it I wanted it to perfectly suit my needs.
This is how much yarn I had left from the original kit...
I took a deep breath and decided I would add 9 more tiles, 7 more granny squares, and 4 more large triangles to make this the size I wanted - an afghan with a total of 25 tiles rather than the original 16. Furthermore, I wanted all my extra blocks to be completely unique from all the previous tiles, squares and triangles, yet use the same colorway as Lucia's tiles so it would be seamless as if Lucia had designed them herself.
And so it began. Part Two of my afghan. This would take longer...
November 1, 2018
Four of my new tiles are done. I decided to name them by their outer color.
Extra Tile #1 - Violet
Extra Tile #2 - Duck Egg
Extra Tile #3 - Vintage Peach
Extra Tile #4 - Storm Blue
November 6, 2018
Creating all the new unique blocks was a delightful challenge. The most difficult part was to make sure they were similar yet different from all the preceding pieces and made for a pleasing color scheme - so no two similar colors next to each other, no two dark colors or two light colors next to each other, etc. The process also gave me new respect for all the time the designers take to come up with their own patterns and color ways. Yet another new world for me. This foray into making my new blocks has made me want to do more of my own designs.
I considered actually writing out my color ways here for the extra blocks as part of why I have this blog is to keep track of what I do and how I made what I made. In the end though, I decided that my extra blocks were in fact very similar to Lucia's (as that was the goal) and I don't want to infringe on her work so I've decided to keep them for myself.
Creating my new blocks
I was able to finish 8 of my 9 extra tiles before I ran out of yarn
My remaining yarn
So now my question was where to get more yarn. Stylecraft yarn is not carried in any of my local stores. I could order more from Poppy's but I didn't want to wait 2 weeks for delivery. I went online to look for a Stateside dealer. I found the yarn at Deramores. Yes, the website says it's a British company however it also looked like I was on the US version of the website so I assumed they had a more local (meaning Stateside) distributor.
3 weeks later...
...my yarn finally arrived. It was shipped from the UK.
As another aside, yarn itself was another world that opened up for me. I had always before stuck with the familiar US brands available at my local craft store - Lion Brand, Red Heart, the Yarnspirations brands... I had never heard of Stylecraft but once I used it I loved it! Then I came across Scheepjes (the whirls!!), Paint Box, and all the lovely "local" Australian wools. So many things I never knew about!
December 7, 2018
All of my extra pieces are done!
This is as far as I would get on this afghan in 2018 as the holidays were closing in and the month got too busy to continue working on this. So close though!
January 16, 2019
The original pattern called for a crocheted join from the back of the afghan. This however would create a ridge and I wanted my afghan to be perfectly flat so I decided to whip stitch all the blocks together. For anyone that is familiar with the original pattern I also omitted all the X's on the tiles and granny squares for the same reason. I wanted a perfectly flat afghan and the X's seemed to cause a bit of a pucker on all the blocks along with the textural bump that I didn't want.
Once again my progress would come to a screeching halt. This time it was because I got notified in mid-January that I had been assigned a booth at a craft show on March 2nd. It was a show I didn't expect to get into and thus had nothing prepared. I spent the next month and a half making products for my show.
After the craft show both my daughters came home for Spring Break on two different weeks in March then I had a number of custom orders to fill so this afghan took a back seat to life.
Finally, at the end of April I had a chance to work on it again.
April 29, 2019
I was nearing the delicious end. I looked at a multitude of possible borders on Instagram. In the end though, I settled on a border that was pretty much the original save for a few extra rows of single crochet.
May 8, 2018
After some procrastinating I decided
today was the day. The afghan was pretty much done but I still had all the ends on my joining that I had to sew in.
One day later...
The final stitch!
IT'S DONE!!!
Sooooo Happy!
Final size was 68 inches square
Cost of the original kit from Poppy's : $68.01
Cost of 8 extra skeins of yarn from Deramores: $23.89
Total cost: $91.90
Start to finish time: around 8 months
Result: Priceless!!
Future plans: This is my entry for this year's Johnson County Fair as well as the Indiana State Fair. After that, I don't know. As I said in the beginning, this normally is not the type of afghan I would make but I fell in love with it anyway. It's not something that would fare well at my house. The finished afghan photos were taken at my in-laws home. They have an immaculate pet free house. My house? My lovely dog sheds her weight in fur every week (or so it seems!) This would be covered in dog hair in 30 seconds, not to mention all the lacy parts that might get ruined. My dog lives on our couch and sleeps on our bed. I dream of one day having a lovely guest bedroom where I can display my makes. Until then, my office and our dining table top are the only pet-hair free areas of our home.
I have considered selling this. Beautiful things should not be kept in boxes but loved everyday. But how do you put a price on it? My joy is in the journey. That much is true. My true enjoyment was the process of creating something beautiful with my own two hands. Now that I've made this I have the pattern, know how much yarn I need and I've already created the color way for the extra blocks. Perhaps I'll make another one. It would certainly take less time. For now though, I've already started my next afghan... and perhaps I'll work on getting one of the children's bedrooms cleaned out for a guest room.